
A Chain Saw Lumber Mill… Oh the possibilities!
Last year, I was beginning to seriously look at constructing a cabin – an idea that has resonated with me for a long time now. In doing some background research, I came across an article referring to milling logs into beams using a chainsaw mill. I found this to be pretty exciting… to be able to convert logs into something more usable than firewood? …and to be able to create my own lumber? …this would be way cheaper than buying logs from a lumberyard, mill or buying a log cabin kit. I watched a bunch of YouTube videos on chainsaw milling and I was hooked. I decided I wanted to try it out. Even if I only made a few planks from the mill, it could prove very worthwhile and cost effective.

After doing some more research, I decided to purchase the Alaskan Mark IV Chain Saw Mill by Granberg International (~$260) [see link below]. I went with this company because all the reviews and videos I watched gave this mill a pretty good report. (Granberg has been making tools for chainsaw milling and sharpening since 1957, so I felt pretty confident in going with them for a mill.) I also liked the fact that this mill clamps onto a chainsaw’s bar and does not require drilling or other modification to the chainsaw or bar.

One of the things I needed to address, is that the chainsaw I owned (A Stihl MS 251) would not be sufficient for doing milling work. Granberg recommends a minimum engine displacement size of 60 cc’s. My Stihl MS251 only has a displacement of 45.6 cc’s, so it would be under-powered. I was able to locate a used Stihl MS 461 online (for about half the cost of a new one) so I decided to purchase this saw as it would have plenty of power (76.5cc’s) to run the mill. I took this saw in to my local Stihl dealer after it arrived and had them go over it for any issues. Some tweaking and it was good to go. I also had a new 32″ bar installed which would allow for cutting logs/boards about 27 or 28″ wide (the full width of the bar is not available due to how the mill attaches; one losses some distance on both sides of the mill due to not being able to attach the mill above the sprocket and also due to the kickback bar.) I opted for a 36″ mill, which is about as big a mill as I figured I could handle on my own. The mill is made of heavy-duty aircraft aluminum and zinc plated steel parts. It is capable of cutting planks and beams up to 32″ wide (depending on bar size) and 1/2″ to 13″ deep. I figured this ought to be more than adequate for what I intend to do with it. Granberg sells larger mills (up to 84″)… but they recommend using an auxiliary oiler kit on bars larger than 36″… this requires drilling two holes in the saw bar tip. Not something I really want to do right now.
I also upgraded from a crosscut chain to a ripping chain. A ripping chain is designed to cut lengthwise as opposed to cross cutting. This, from all the video reviews I watched, makes lumber milling much easier and much more enjoyable. (More on this in a later post)
I had everything I needed. My dad said he had a big willow tree that had come down and I was welcome to practice on it. So I loaded everything into the truck and headed down to try out the mill… as you can see everything went well.

Suddenly, opportunities and options started to present themselves to me. I would be on a drive somewhere and notice a tree that had fallen down. Now, instead of thinking to myself, “Boy, someone is going to have a big job of cutting that big tree into fire wood!”, I found myself considering things like, “Hmm… I bet you could cut some interesting boards from that” or “That would probably have some amazing grain to it… would make awesome boards!”
I am very pleased with this mill and have big plans for it in the future… I hope you will follow me on this journey!
Links:
What’s that Smell?
I woke up this morning and checked my email as I usually do. I had a notification email – from a neighborhood group that I am a part of – warning of a skunk in the area. Her dog had gotten sprayed and she was dealing with everything that goes along with that.
My dog has been sprayed a couple times so it brought back some not so fond memories. However, since this is something people have to deal with occasionally, especially those of us who are dog owners, I figured maybe it would be worthwhile sharing some information.

After an encounter with a skunk, in which a party is sprayed. (We will assume it is the family pet.) The most pressing concern is to deal with the irritating skunk smell. People always say to use tomato juice. I have tried that. My results were the smell was masked for a while (at best) and my normally white dog took on a sort of pink tinge. Plus, I think it still left a smell that I eventually got used to but others could still detect.
Then, I got to thinking about this… what makes the skunk smell so stinky? It was time to do some research! I found out that skunks have two glands along their anus that produce the skunk’s offensive spray, which is a mixture of sulfur-containing chemicals. Ah Ha! If it is chemical there ought to be a way of counteracting it or, better still, breaking down the chemical compounds to get rid of the smell. Let’s attack it chemically!
Thiols, or sometimes known as mercaptans, are contained in the skunk spray and are what needs to be taken care of.

I have found this solution to be pretty effective at attacking the thiols… mix 1 quart hydrogen peroxide, 1/4 cup baking soda and 1 teaspoon dish soap. (I use Dawn dish soap because it is known for its ability to cut oils — which is also its primary purpose in this solution!) This solution works by attacking the chemical bonds. The dish soap helps to wash away the oils that can have a lingering effect. Use this solution to wash the sprayed areas. Just be careful using it around the face and eyes!
Another possible alternative is to purchase a specialty skunk scent removal product. Numerous ones are available at pet stores and online. I have never used any of these (but I know people who have) because the hydrogen peroxide solution works very well and I am fortunate enough to not have to utilize these remedies that often.
I hope I haven’t jinxed myself!
Gardening – an exercise in patience and faith.
For as long as I can remember, I have always had a garden of some sort… when I was growing up on the family farm, the garden we had was of pretty good size… later, as work brought me to the suburbs, I have continued to plant seeds with the hope of harvesting fresh produce. Why bother? Well, for one thing I like the satisfaction of seeing the plants grow and knowing just how fresh those veggies really are. Second, I want to be able to grow and harvest the foods that I will be eating. (Doing so enables me the control of what pest control methods are used and ensures that my food is truly organic!) And finally, growing my own food can be much more cost effective than buying it at the grocery store or local farmers’ markets.
Now, I know that I do not currently have the space to grow everything that I would like to, but I figure something is better than nothing and every little bit helps!
For the last few years I have been planting in some raised beds that I had placed over an old cement foundation. I had not been happy with my results. Either, the plants were not able to grow as well because they were not able to establish a deep enough root system or, radiated heat off of the cement slab adversely heated the soil and increased moisture evaporation. I suspect that it was a combination of both.

So this year, I made the decision to relocate my raised beds off of the cement slab and I believe my plants are much happier. Gardening is something that everyone can do. Start small if you need to and make changes along the way as you learn new things.

This year, I have planted corn, cucumbers, sweet peas, beets, carrots, onions, tomatoes, green and yellow beans zucchini squash, lettuce, chard, kale, basil, rosemary, peppermint, cilantro, parsley and a variety of pepper plants.
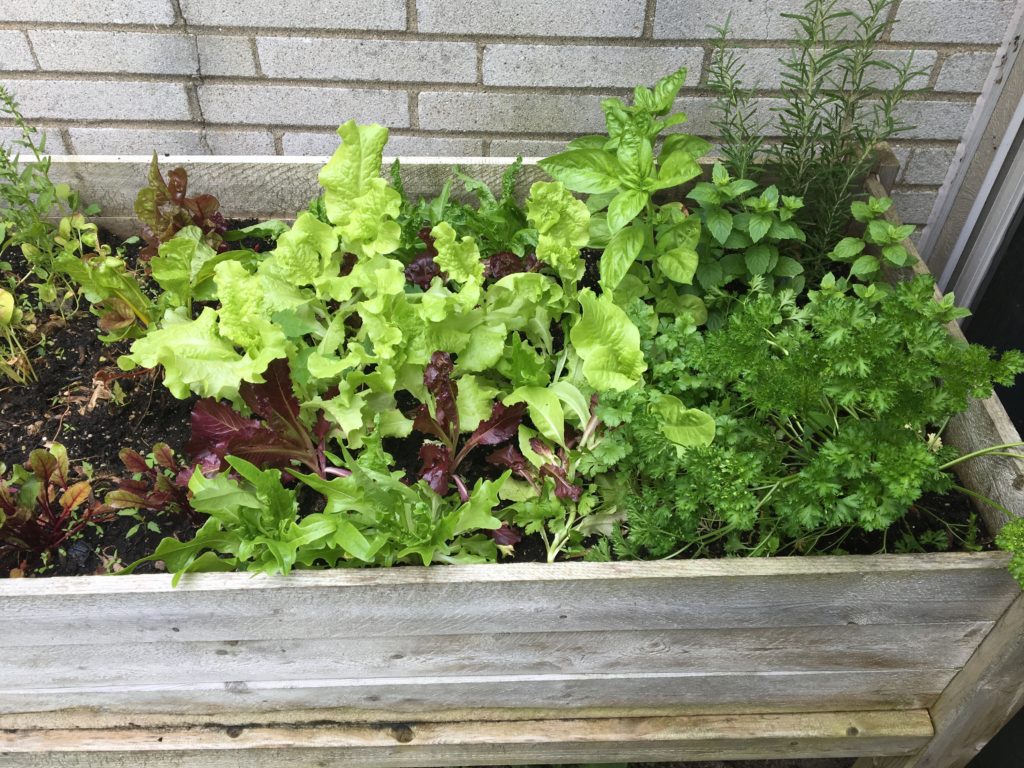
I have already harvested some peas and the first batch of beans are just about ready. I also planted some beet seeds that don’t seem to be doing anything. I planted 24 seeds and have 3 seedlings growing… I am hopeful that a few more will still germinate. Sometimes one just has to wait and see.
Welcome to my Blog!
Hi everyone! My name is Jon. I am happy you are here. I recently decided that I want to share a little bit of my life journey with others.

I am very interested in becoming more self-sufficient by doing those things that I have the time and knowledge to do and by learning those things I don’t know. I consider myself a life-long learner, so I am always learning new things. (I would not say that I am an expert in any one category but I think I have a good base of knowledge and an ability to figure out how to get something done.)
I am interested in wood working, gardening and travel. I believe in helping others when I can, so you can probably expect to see some of that reflected here as well. I hope you will join me as I document and share my journey!
Recent Comments